---
title: "SFTP server in Kubernetes with SFTPGo — Resizes"
url: "https://resiz.es/blog/sftp-server-in-kubernetes-with-sftpgo"
description: "Have you ever needed to create an SFTP server? How do you do it? For those who have created an SFTP server before, you probably know that it is not easy to create and maintain an SFTP server. There…"
---
[← All articles](https://resiz.es/blog)
17 February 2025 · 8 min read
# SFTP server in Kubernetes with SFTPGo
[María GarcíaJunior Platform Engineer](https://resiz.es/blog/authors/maria)
Have you ever needed to create an SFTP server? How do you do it?
For those who have created an SFTP server before, you probably know that it is not easy to create and maintain an SFTP server. There are many ways to do it, but in this case, we are going to install SFTPGo in our Kubernetes cluster.
SFTPGo is an open-source SFTP server that allows users to securely transfer files over SSH. It is written in Go (Golang) and is designed to be lightweight, easy to configure, and highly customizable. It supports multiple storage backends, including local filesystems, cloud storage (like S3, Google Cloud Storage, etc.), and more.
The deployment of SFTPGo on an EKS cluster begins with provisioning the required resources, so let's start by creating the necessary infrastructure with Terraform.
## External Secret
For managing secrets in EKS, we are using [External Secrets Operator](https://external-secrets.io/). To store the secrets for our SFTP server, we will use AWS Secrets Manager. An external secret is a Kubernetes resource that allows you to manage secrets from an external secret manager, in this case, AWS Secrets Manager.
Here is the code to create the secret in AWS Secrets Manager:
```hcl
resource "aws_secretsmanager_secret" "sftpgo" {
name = "sftpgo"
description = "Secrets for sftpgo in EKS production cluster"
}
```
Once created, we will need to enter the following secrets:
- `SFTPGO_DEFAULT_ADMIN_USERNAME`: example\_user
- `SFTPGO_DEFAULT_ADMIN_PASSWORD`: example\_password
- `SFTPGO_DATA_PROVIDER__DRIVER`: postgresql
- `SFTPGO_DATA_PROVIDER__NAME`: sftpgo.db
- `SFTPGO_DATA_PROVIDER__HOST`: sftpgo-postgresql.sftpgo.svc.cluster.local _(this might change, it depends on your needs!)_
- `SFTPGO_DATA_PROVIDER__PORT`: 5432
- `SFTPGO_DATA_PROVIDER__USERNAME`: sftpgo
- `SFTPGO_DATA_PROVIDER__PASSWORD`: sftpgo\_pg\_pwd
As you can see, we are using a PostgreSQL database to store the users and the configuration for our SFTP server. And of course, we need to create the database. We will do this in the next section.
## SFTPGo resources
On the other hand, it is necessary to create any other resource related to this new SFTP (policies, IAM role, permissions, etc.).
We will create one role to access the **AWS Secrets Manager** and another to **access an S3 bucket**.
> The **s3 bucket** is used for storing the documents managed in the SFTP. We can use a single bucket for everything, but it is possible to use multiple buckets. Each user inside the SFTP can have access to a different bucket, or even a different folder inside the same bucket.
Our code would look something like this:
```hcl
data "aws_iam_policy_document" "sftpgo" {
statement {
actions = [
"secretsmanager:GetResourcePolicy",
"secretsmanager:GetSecretValue",
"secretsmanager:DescribeSecret",
"secretsmanager:ListSecretVersionIds"
]
resources = [aws_secretsmanager_secret.sftpgo.arn]
}
}
resource "aws_iam_policy" "sftpgo" {
name = "sftpgo"
path = "/"
description = "Policy to get sftpgo secrets"
policy = data.aws_iam_policy_document.sftpgo.json
}
resource "aws_iam_role" "sftpgo" {
name = "external-secrets-sftpgo"
assume_role_policy = jsonencode({
Version = "2012-10-17"
Statement = [
{
Action = "sts:AssumeRole"
Effect = "Allow"
Principal = {
AWS = "arn:aws:iam::${data.aws_caller_identity.current.account_id}:role/external-secrets"
}
}
]
})
}
resource "aws_iam_policy_attachment" "sftpgo" {
name = "sftpgo"
roles = [aws_iam_role.sftpgo.name]
policy_arn = aws_iam_policy.sftpgo.arn
}
resource "aws_s3_bucket" "sftpgo" {
bucket = "sftpgo" # TODO: change this to the name of the bucket you want to use
}
data "aws_iam_policy_document" "s3_full_access" {
statement {
actions = [
"s3:*",
]
resources = [
aws_s3_bucket.sftpgo.arn,
"${aws_s3_bucket.sftpgo.arn}/*",
]
}
}
resource "aws_iam_policy" "s3_full_access" {
name = "S3AccessPolicy-${aws_s3_bucket.sftpgo.bucket}"
policy = data.aws_iam_policy_document.s3_full_access.json
}
resource "aws_iam_role" "irsa_role" {
name = "sftpgo"
assume_role_policy = jsonencode({
Version = "2012-10-17"
Statement = [
{
Effect = "Allow"
Principal = {
Federated = "arn:aws:iam::${data.aws_caller_identity.current.account_id}:oidc-provider/${replace(data.aws_eks_cluster.cluster.identity[0].oidc[0].issuer, "https://", "")}"
}
Action = "sts:AssumeRoleWithWebIdentity"
Condition = {
StringEquals = {
"${replace(data.aws_eks_cluster.cluster.identity[0].oidc[0].issuer, "https://", "")}:sub" = "system:serviceaccount:sftpgo:sftpgo"
}
}
}
]
})
}
resource "aws_iam_role_policy_attachment" "attach_s3_policy" {
role = aws_iam_role.irsa_role.name
policy_arn = aws_iam_policy.s3_full_access.arn
}
resource "aws_s3_bucket_public_access_block" "sftpgo" {
bucket = aws_s3_bucket.sftpgo.id
block_public_acls = true
block_public_policy = true
ignore_public_acls = true
restrict_public_buckets = true
}
```
> **¿What´s the IRSA Role?**: This Terraform code creates an IAM role that can be assumed by a ServiceAccount in an EKS cluster via IRSA. The role has a policy attached to it that allows access to S3. This is useful for applications running on Kubernetes that need to access AWS resources, such as S3, securely and without needing to store credentials directly on the cluster.
To continue, we must also add a new data reference to our EKS cluster in our `data.tf`:
```hcl
data "aws_eks_cluster" "cluster" {
name = "example_name_cluster" # TODO: change this to the name of your cluster
}
```
* * *
## SFTPGo Helm Chart
When everything mentioned above has been created, we can continue creating the necessary chart to set up our SFTP server in Kubernetes.
Let's start by creating a new folder called `sftpgo`. Inside this folder, we will begin by creating the two main files: `values.yaml` and `Chart.yaml`.
### Chart.yaml
here will be listed the different dependencies that we will be using and their versions. In this case, **sftpgo** and **postgresql**.
> **PostgreSQL** is required to store the new users who will use this SFTP and the configuration for the SFTP server.
It should look something like this:
```yml
apiVersion: v2
name: sftpgo
description: SFTPGo - Secure SFTP Server
type: application
version: 0.23.1
appVersion: "2.5.4"
dependencies:
- name: sftpgo
version: 0.23.1
repository: "https://charts.sagikazarmark.dev"
- name: postgresql
version: 16.4
repository: "https://charts.bitnami.com/bitnami"
```
### Values.yaml
On the other hand, there is the `values.yaml`, where the ingress, the serviceAccount, variables (in this case, retrieved from a secret stored in AWS) etc. are collected.
It should looks like this:
```yml
sftpgo:
config:
common:
proxy_protocol: 1
data_provider:
create_default_admin: true
envFrom:
- secretRef:
name: sftpgo
serviceAccount:
annotations:
eks.amazonaws.com/role-arn: arn:aws:iam::ACCOUNT_ID:role/sftpgo # TODO: change this to the IRSA role
ui:
ingress:
enabled: true
className: external
annotations:
kubernetes.io/external-dns.create: "true"
hosts:
- host: sftpgo.example.com # TODO: change this to the domain you want to use
paths:
- path: /
pathType: ImplementationSpecific
```
Once we have these two files, we will create the `Chart.lock` and the `charts` with the following command:
```sh
helm dep up
```
With this, a folder with the Helm Chart dependencies called `charts` and a `Chart.lock` file should have been created inside our `sftpgo` folder.
A folder called **templates** is also needed. There will be created both `externalsecret.yaml` and `secretstore.yaml`. This will allow us to manage the secrets we have previously stored in our **AWS Secret Manager**.
### postgresql
It's necessary to configure our postgres. To do so, access to the Postgres database is done through the `sftpgo-postgresql` secret.
```sh
kubectl exec -it sftpgo-postgresql-0 -- psql -U postgres
```
Once inside, write the configuration needed, in this case it is:
```sh
CREATE USER "sftpgo" WITH ENCRYPTED PASSWORD 'sftpgo_pg_pwd';
CREATE DATABASE "sftpgo.db";
GRANT ALL PRIVILEGES ON DATABASE "sftpgo.db" TO "sftpgo";
CREATE TABLE schema_version (
version INT NOT NULL
);
GRANT ALL PRIVILEGES ON SCHEMA public TO sftpgo;
SELECT grantee, privilege_type
FROM information_schema.role_table_grants
WHERE table_schema = 'public';
ALTER SCHEMA public OWNER TO sftpgo;
exit
```
Subsequently,enter this time in the sftpgo specific database.
```sh
kubectl exec -it sftpgo-postgresql-0 -- psql -U postgres -d sftpgo.db
GRANT ALL PRIVILEGES ON DATABASE "sftpgo.db" TO sftpgo;
GRANT USAGE, CREATE ON SCHEMA public TO sftpgo;
ALTER SCHEMA public OWNER TO sftpgo;
exit
```
With this we would already have the necessary configuration inside postgres.
> **Remember**: Each time the password and user are changed in the secret manager, we must (in addition to killing it in argocd) perform the above steps again inside postgres.
### secretstore.yaml
The secret store is necessary to be able to manage our secrets. Its code would look something like the following:
```yml
apiVersion: external-secrets.io/v1beta1
kind: SecretStore
metadata:
name: external-secrets-sftpgo
spec:
provider:
aws:
service: SecretsManager
role: arn:aws:iam::ACCOUNT_ID:role/external-secrets-sftpgo # TODO: change this to the IRSA role
region: us-east-1 # TODO: change this to the region of your cluster
```
### externalsecret.yaml
Finally, the `externalsecret.yaml` file that contains all the secrets we mentioned earlier.
```yml
apiVersion: external-secrets.io/v1beta1
kind: ExternalSecret
metadata:
name: sftpgo
namespace: sftpgo
spec:
refreshInterval: "10m"
secretStoreRef:
name: external-secrets-sftpgo
kind: SecretStore
target:
name: sftpgo
dataFrom:
- extract:
key: sftpgo
```
## Let's test it!
With all our resources created, we can prove that everything is going well with several steps:
### 1\. Enter the SFTPGo host
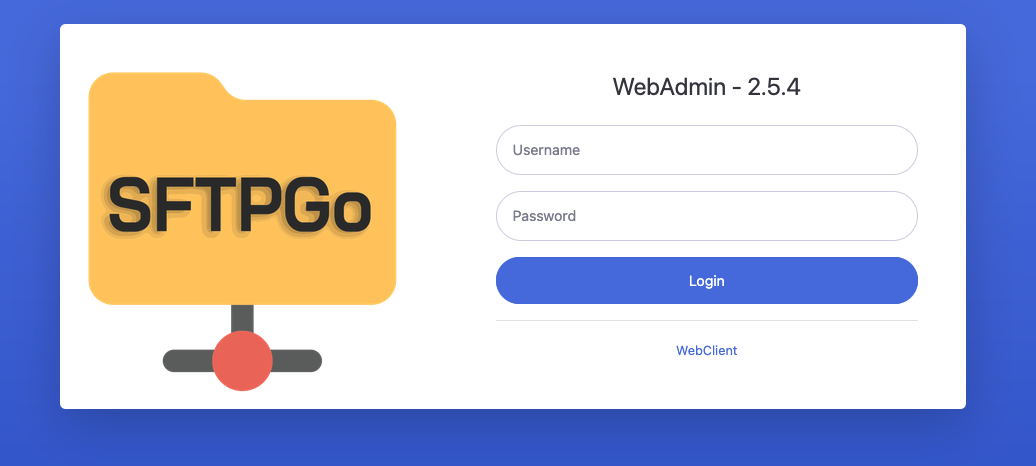
We can enter the host that we created earlier in the `values.yaml` file (sftpgo.example.com) and see a login screen like the one in the following image. With what we have done, it should be possible to log in as the admin user using the credentials stored in our AWS Secret Manager.
### 2\. Send a file from our local to SFTPGo.
> **Remember**: We are doing everything from a user login, so we first need to create a user in the SFTPGo UI.
To save a test file in SFTPGo, go to our terminal and log in with the following command:
```sh
sftp user@sftpgo.example.com
```
Later, after creating a test .txt file, we will save it in SFTPGo inside a folder called "example" _(It's can also be saved directly in the root directory; it's just a test to see the possibility of navigating and organizing files within SFTPGo)_.
```sh
sftp> mkdir /example
sftp> cd /home/example
sftp> put test_file.txt
```
If everything has gone well, it should be possible to see our file in the SFTPGo UI and if you go to the S3 bucket, you should also be able to see the file stored there.
## Resources
- [SFTPGo Docs](https://docs.sftpgo.com/latest/tutorials/postgresql-s3/)
- [SFTPGo Helm Chart](https://artifacthub.io/packages/helm/sagikazarmark/sftpgo)
[DevOps](https://resiz.es/blog/tags/dev-ops)[PlatformEngineering](https://resiz.es/blog/tags/platform-engineering)[SFTPGo](https://resiz.es/blog/tags/sftp-go)[Kubernetes](https://resiz.es/blog/tags/kubernetes)[DeveloperExperience](https://resiz.es/blog/tags/developer-experience)[ExternalSecrets](https://resiz.es/blog/tags/external-secrets)[Terraform](https://resiz.es/blog/tags/terraform)[AWS](https://resiz.es/blog/tags/aws)